Accessibility & Inclusion
Using Your Computer > Adapting Your Computer To Meet Your Needs
Mac OS X Accessibility Features
By Lasa Information Systems Team
Universal access to ICT is no longer a just a question of ethics and good practice, it is also a legal necessity. So how do Apple Computers, which has a long reputation for good accessibility, shape up? To find out, we’ll be going under the hood of Apple’s latest operating system and looking at the accessibility features built into OS 10.4, Tiger.
Links to information on universal access to ICT and third party accessible technology for Apple Mac computers can be found at the end of this article.
Universal Access
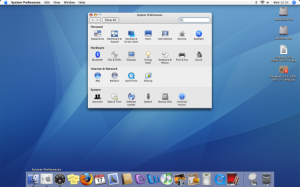
Apple Mac OS X Tiger (10.4) comes bundled with what Apple calls Universal Access, located in the System Preferences panel. System Preferences also contains a handy Speech utility which contains useful text-to-speech and speech recognition technology.
To locate Universal Access, navigate to the Dock located at the bottom of the screen and click on System Preferences --> Universal Access
This brings up the Universal Access screen, which has four different tabs covering accessibility options for Seeing, Hearing, Keyboard and Mouse.
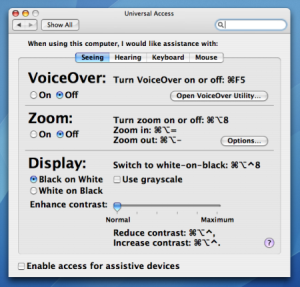
At the bottom of the universal Access screen, there’s a checkbox for Enabling access for assistive devices. Checking this box allows assistive applications to access information about other applications running the Mac, such as the location, size and name of windows, buttons and menus. Be aware that some assistive applications require this to be on for certain features to work, whilst other applications will not function at all if this feature is turned off.
Connecting an assistive application that requires access will generally prompt for this as soon as it is connected. Enabling access also requires an administrator’s password because this feature slightly reduces the security of your Mac because one programme can now see information in the window of another programme. However, this should not be a worry for most businesses or individuals.
Seeing
The Seeing tab provides users with three options to configure VoiceOver, Zoom and Display options.
VoiceOver provides the Mac with a speaking voice to help partially-sighted and blind users navigate around the computer by reading out menu items and text. The VoiceOver panel features two radio buttons for turning VoiceOver on or off with a mouse click. It can also be turned on or off by pressing the command key (⌘) and F5 on the keyboard. A third button, called Open VoiceOver Utility brings up a box with options to configure the Mac’s speaking voice. We’ll look at this later on.

Further down, the Zoom panel provides options to zoom in or out on the Mac’s display. Again, this function can either be switched on or off by clicking on two radio buttons or by pressing command and alt and 8 together on the keyboard.
Clicking on the Options button allows users to control the range for rapid zooming by setting the maximum (up to 20 times) magnification and minimum zoom.
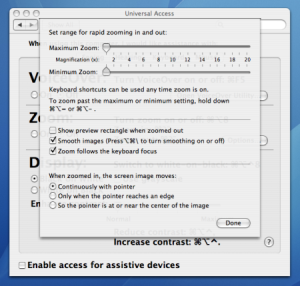
The zoom options panel also contains options to show a preview rectangle whilst zoomed out – this helps users to navigate their mouse around the screen before zooming in for more detail. There are also options to turn the smoothing of images on or off, or zooming that that takes its cue from the keyboard focus.
At the bottom of this panel, three radio buttons present options for controlling how the screen image moves whilst zoomed in.
Hearing
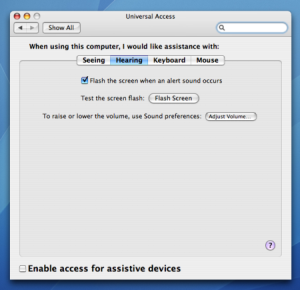
For those with hearing difficulties, you can set the Mac to flash the screen instead of beeping to alert you under System Preferences --> Universal Access --> Hearing.
There are two components in Universal Access that are useful for people with physical disabilities. These are the Keyboard options panel and the Mouse options panel.
Keyboard
If you have difficulty using a keyboard, the Mac comes equipped with two features called Sticky Keys and Slow Keys.
Turning on Sticky Keys allows a user who can only push one button at a time to use the modifier keys (Shift, Control, Alt and Command) to make key stroke combinations without physically having to hold down two or more keys at the same time. For example, to type a capital A, press the shift key once and then press the ‘a’ key. Users can also turn on audio and visual prompts to indicate which modifier key has been activated.
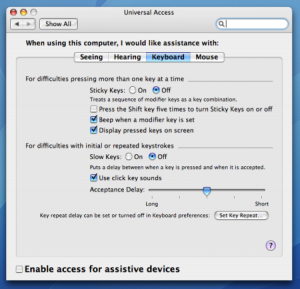
Slow Keys is useful for if users with reduced motor control who may tend to accidentally hit the wrong keys. When Slow Keys is turned on, the keystroke will be ignored until a user settable delay has passed. Again, audio cues for this feature can be optionally turned ion or off.
Mouse
Mouse Keys is designed for users who have difficulties using a mouse but are able to use a keyboard. When Mouse Keys is turned on, the cursor can be moved using the arrow keys on the numeric keypad. The cursor can be moved horizontally, vertically and even diagonally. In addition, the numeric keypad 5 replaces the mouse button click. Holding down 0 allows users to click and drag items. Pressing fullstop on the numeric keypad releases the mouse again. Users of Mac laptops will have to hold down the ‘fn’ key to turn that part of the keyboard into a numeric keypad.
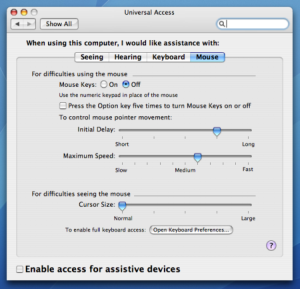
Pressing the Open Keyboard Preferences button allows users to customise keyboard settings to their own needs. In the Keyboard Preferences panel, users can modify the keyboard shortcuts for full keyboard access.
Speech Recognition - Settings
To turn on Speakable Items go to System Preferences --> Speech --> Speech Recognition
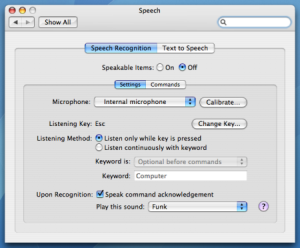
By default, speech recognition listens for commands only when users press a certain key (or keys), called the "listening key." The default listening key is the Escape (Esc) key. Users may prefer to use a listening key when working in a noisy environment, or for greater control over when speech is interpreted as a command by the Mac. For example, if iTunes is playing, iTunes will pause playing when the listening key is pressed.
Users can also have the computer listen continuously and act on a command when it hears a spoken word. For example, users can require the Mac to listen whenever it hears the word "computer" spoken. If users speak a command without saying the keyword first, the Mac won't act on the command, even when listening is turned on (that is, the microphone and feedback lines are not dimmed in the speech feedback window).
To have the computer listen continuously, select "Listen continuously with keyword." Users then choose how they want to use the keyword from the "Keyword is" pop-up menu. Type the word or phrase users want to use to address the computer in the Keyword field. Users can use any word or phrase for the keyword. Long words work better than short ones. The Mac will then play spoken word or sound in recognition of a command.
Speech Recognition - Commands
Clicking on the Commands tab allows the user to configure settings for spoken commands that the Mac will respond to. The pre-programmed commands are fairly simple and allow users to cut and paste, open, switch or quit applications, such as Address Book, Mail, iCal, Safari, etc.
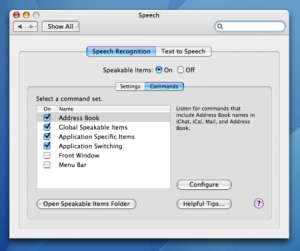
If you click on Open Speakable Items Folder you will see a complete list of speakable items that Apple has pre-programmed for the Mac. Unfortunately there is no scope for users to record their own commands.
Speech Commands
Clicking the Speakable Items button brings up the on-screen microphone, which gives a visual representation of input sound levels. Clicking a small triangle at the bottom of the on-screen microphone brings up the same list of Speech Commands we saw earlier.
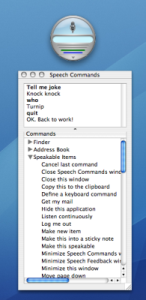
Using the Mac’s built-in microphone, we found it reasonably responsive to spoken commands. However, be prepared to spend a few minutes training the Mac to recognise your voice. You may also want to invest in a USB headset with microphone as the Mac finds it difficult to recognise your voice against a noisy background.
Text to Speech
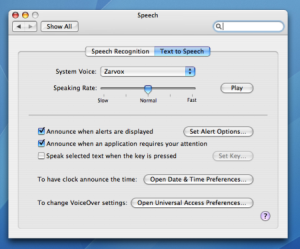
Clicking on the Text to Speech tab allows the user to select from a range of system voices, each with its own personality. As a fan of science fiction, we quite liked the alien sounding Zarvox voice.
[image 10 Mac OS 10.4 Text to Speech tab]
You can also change the speaking rate of your Mac’s voice and choose options to have it announce the time and date.
VoiceOver Utility
The VoiceOver utility can be accessed via System Preferences -->Universal Access -->Seeing, and it allows users to tweak the Mac’s speaking voice to their own personal satisfaction. Pressing Control + F5 switches VoiceOver on or off.
The Verbosity tab provides options for controlling how the Mac’s voice deals with punctuation, text attributes (such as bold, highlighting, new paragraph) and speaking whilst users type.
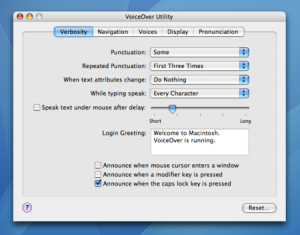
When VoiceOver is switched on it draws an outline box around speakable items on the screen, such as menu commands or web page hyperlinks. This is useful for partially sighted users who need help navigating around the screen. The Navigation tab gives access to how the Mac speaks these items. The Display tab controls options for how the Mac displays speakable items.
The Voices tab allows users to choose from a list of 23 voices, with options to tweak the volume and pitch of the voice itself. This is useful should you tire of the Mac’s various speaking voices and pine for something different.
The Pronunciation tab offers a selection of phrases, such as SMTP, 802.11g, along with a pronunciation guide. Users can add their own words and pronunciation guide to the list. This is particularly useful for those who regularly use technical phrases and jargon in their work.
We particularly liked the Mac’s ability to speak as you type. Our preference was to have the Mac speak each word rather than each letter typed, a useful feature for blind and partially sighted users.
Extending Speech Recognition Command Sets
By default, the Mac’s Accessibility features are configured to work with core applications - Mail, Address Book, iCal and Text Editor. However, you can extend the Mac’s speech recognition ability with third party command sets for Microsoft Office on the Mac (the Entourage mail, address book and calendar application as well as Word, Excel, PowerPoint, MSN Messenger) and Apple’s own iPhoto, iTunes and more.
Third party accessibility products
The Apple Mac is also designed to work with a wide range of third party Assistive Technology products, such as screen-readers, keyboards, mouse devices, etc. Apple’s Assistive Technology page allows you to search the company’s database of compatible third party products.
Forthcoming Improvements
Want to know what’s coming up in the next version of OS X, code-named ‘Leopard’? Visit Apple's Leopard accessibility page for more.
Legal
Making your ICT universally accessible is ethical and good practice, so what about the legal and practical guidelines? Fortunately, Abilitynet has a number of useful guides and factsheets to get you started.
Voluntary sector organisations can also get Abilitynet’s ‘Easy Free and Quick ICT Accessibility Pack (booklet and CD)’ from the ICT Hub web site.
Conclusion
With this article, our intention was to show someone planning to buy a Mac what accessibility features they can expect to find in OS 10.4 and point them in the direction of further information.
Having got our caveat out of the way, we believe accessible computing need not be an expensive and complicated business. In this respect, OS 10.4 brings universal accessibility to the fore and allows users plenty of scope for controlling the Mac’s core applications. This can be quickly extended with software for additional speech recognition command sets and a wide range of third party hardware solutions. If you need an accessible operating system, OS 10.4 is a good place to start looking.
Useful links
Abilitynet – assistive technology for people with disabilities
Apple Computers - Accessibility
ICT Hub publications - ‘Easy Free and Quick ICT Accessibility Pack (booklet and CD)
About the author
Lasa Information Systems Team
Lasa's Information Systems Team provides a range of services to third sector organisations including ICT Health Checks and consulting on the best application of technology in your organisation.
Lasa IST maintains the knowledgebase.
Follow us on Twitter @LasaICT
Glossary
Assistive Technology, CMS, Database, Flash, Hardware, Hub, ICT, MAC, Operating System, SMTP, Software, Switch, Text to speech, USB, Web Page, Web Site
Related articles
Published: 3rd October 2006
Copyright © 2006 Lasa Information Systems Team
 This work is licensed under a Creative Commons Attribution-NonCommercial-NoDerivs 2.0 UK: England & Wales License.
